user guide
how to prepare, connect, and perform with VJ‑XY and OP‑XY. read top to bottom before a first show, or jump to a section.
1. overview
VJ‑XY is a live visual instrument for OP‑XY performances. it runs on iPhone, iPad, and compatible Apple silicon Mac, holds your video, photo, GIF, matrix, and canvas clips in performance order, and lets OP‑XY trigger visuals while the music plays.
the usual flow is simple: prepare a set, connect OP‑XY, then perform. during preparation, you organise clips into scenes and choose how each scene behaves. during performance, OP‑XY is the primary controller while VJ‑XY handles visual playback and audience output.
VJ‑XY is visuals only. it keeps imported media muted, so the music stays with OP‑XY and the rest of your audio setup.
2. what you need
VJ‑XY runs on iPhone and iPad, and can also run on Apple silicon Mac through the iOS/iPadOS app where available. it can run locally for testing, or send audience output to a projector, TV, or capture path while OP‑XY sends MIDI.
for the simplest setup, use:
- an iPhone, iPad, or compatible Apple silicon Mac running VJ‑XY.
- OP‑XY as the MIDI controller and music source.
- USB‑C MIDI or Bluetooth MIDI between OP‑XY and the device running VJ‑XY.
- an optional USB‑C or HDMI display adapter for audience output.
- short prepared video loops, still images, animated GIFs, or built-in matrix clips.
- transparent GIFs or stills for canvas layers.
OP‑XY is the live control surface. the device running VJ‑XY is mainly for preparation, rehearsal, vfx testing, and fallback correction. the external display is audience content only and should not show editing controls, settings, or setup screens.
3. quick start
this is the shortest path from an empty library to a working visual set. it is useful before a rehearsal, or when checking that OP‑XY and the display path are behaving.
- create a set.
- add one scene.
- add a few clips from
clips: choosefiles,library,matrix, orcanvas. GIFs come in throughfilesorlibraryalongside video and photo. - set the scene
chvalue. - on OP‑XY, open
auxiliary, then selecttrack 3: external midi. - press
M1and set the OP‑XY MIDI channel to match the scenech. - play notes from
F3upward to trigger clips in the scene. - press
M2, then holdshiftand set the encoders toCC1,CC2,CC3, andCC4. - press play in VJ‑XY to enter perform mode.
- tap the screen in perform mode if you need previous, play/pause, next, or live controls.
before using this on stage, also test the projector or capture path, the MIDI receive indicator, and any vfx you plan to move from OP‑XY.

4. prepare a set
a set is the full performance. it contains the scenes you want to move through during a show, usually in the same order as your songs, sketches, or sections.
create one set for each performance or rehearsal group. keep the set focused enough that you can find scenes quickly while performing. if you are experimenting with a different order or visual direction, make a separate set instead of overloading the live one.
to prepare a set:
- open the sidebar.
- use the set list to add a set.
- name it clearly.
- add scenes in performance order.
- rehearse the set from top to bottom before using it live.
set names and scene names should be short. they need to be readable quickly during rehearsal or performance.

5. add scenes
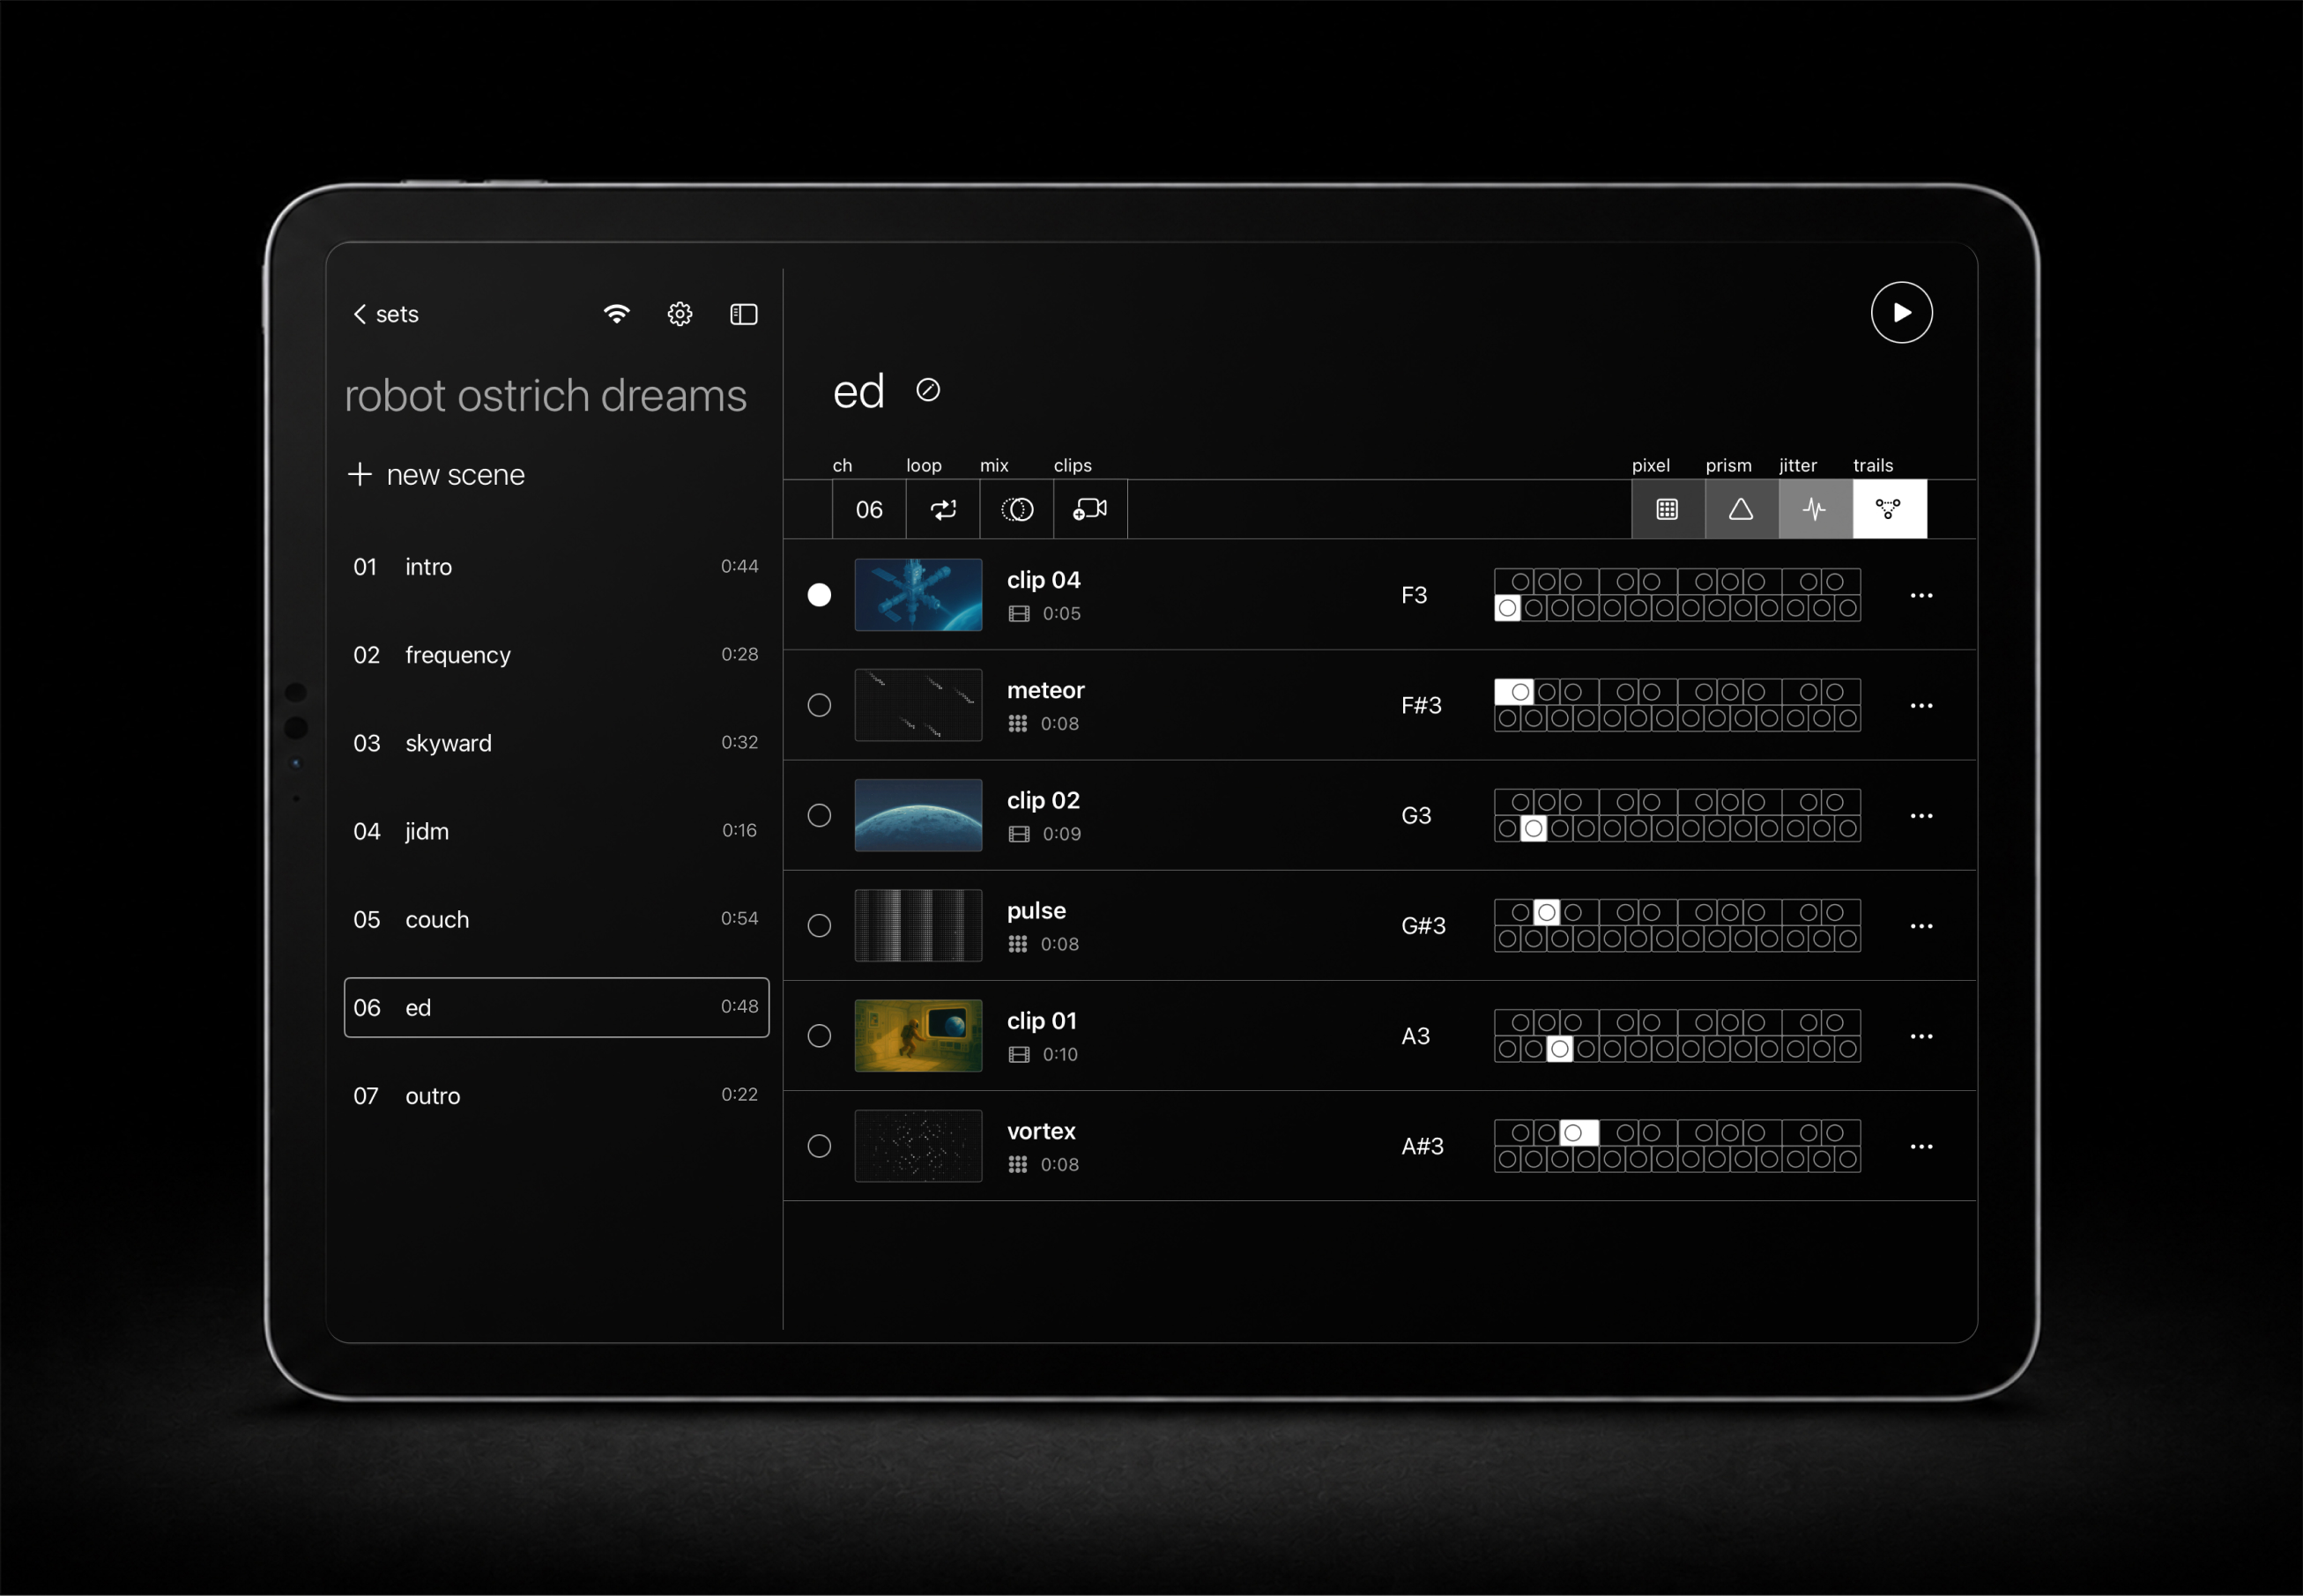
a scene is usually one song, cue, or section of a performance. it holds clips, a MIDI channel, a playback behavior, a default mix, and four vfx assignments.
scenes are the main bridge between OP‑XY and VJ‑XY. each scene can listen on its own MIDI channel, which lets one OP‑XY external MIDI track trigger the right clips for the current part of the set.
to set up a scene:
- select a set.
- add a scene from the sidebar.
- set
chto the OP‑XY MIDI channel you want that scene to use. - set
looptoclip,cycle, orshuffle. - set
mixto the transition style for the scene. - add clips to the scene.
- test notes from
F3upward.
avoid duplicate scene channels inside the same set. if two scenes use the same channel, OP‑XY input can point at the wrong visual group.

6. add clips
a clip is a visual item inside a scene. clips can be imported video, imported photos, animated GIFs, bundled sample material, generated matrix visuals, or layered canvas compositions.
clips loop by default. when a clip is selected or triggered, it keeps playing until VJ‑XY advances to another clip, another scene, or a generated clip duration completes in cycle or shuffle.
use the clips control to add material:
- choose
userto reuse media already imported into VJ‑XY. - choose
matrixfor built-in generated visuals. - choose
canvasto build a layered composition from stills and animated GIFs. - choose
filesfor videos, still images, or GIFs from Files, iCloud Drive, AirDrop folders, external storage, or other file providers. - choose
libraryfor videos, photos, or GIFs from the device photo library.
imported media is copied into VJ‑XY storage. this makes performance more reliable because the set does not depend on the original file location still being available.

7. connect OP‑XY
OP‑XY controls VJ‑XY through MIDI. notes trigger clips, and CC1 through CC4 control the four vfx slots or matrix controls for the active scene.
you can connect with USB‑C MIDI or Bluetooth MIDI. Bluetooth MIDI pairing is opened from the sidebar MIDI/Wi‑Fi button, which uses Apple's Bluetooth MIDI browser. the MIDI indicator also blinks on incoming MIDI, including unmapped events, so it is useful for confirming that VJ‑XY is receiving data at all.
to connect OP‑XY:
- tap the sidebar MIDI/Wi‑Fi button in VJ‑XY.
- connect OP‑XY through Bluetooth MIDI, or connect USB‑C MIDI.
- confirm the MIDI indicator shows a usable connection.
- send any note or CC from OP‑XY and watch for the receive blink.
- set the scene
chto match OP‑XY.
if the indicator does not blink, fix the connection before editing mappings or scenes. no blink means VJ‑XY is not receiving usable MIDI input.

8. sequence clips
clip triggering starts at F3 for each scene. the first clip in the scene maps to F3, the next clip maps to the next note, and so on.
this makes OP‑XY sequencing predictable. you can write notes into the external MIDI track and have the visual sequence follow the music without building a separate timeline in VJ‑XY.
to sequence clips from OP‑XY:
- open
auxiliaryon OP‑XY. - select
track 3: external midi. - press
M1. - set the MIDI channel to match the VJ‑XY scene
ch. - use notes from
F3upward. - keep the clip order in VJ‑XY aligned with the note pattern on OP‑XY.
canvas clips flatten into the note order: the parent canvas row gets its note first, then each nested layer takes the following notes in order.
if a note triggers the wrong clip, check the clip order first. if it triggers the wrong scene, check the scene channel.

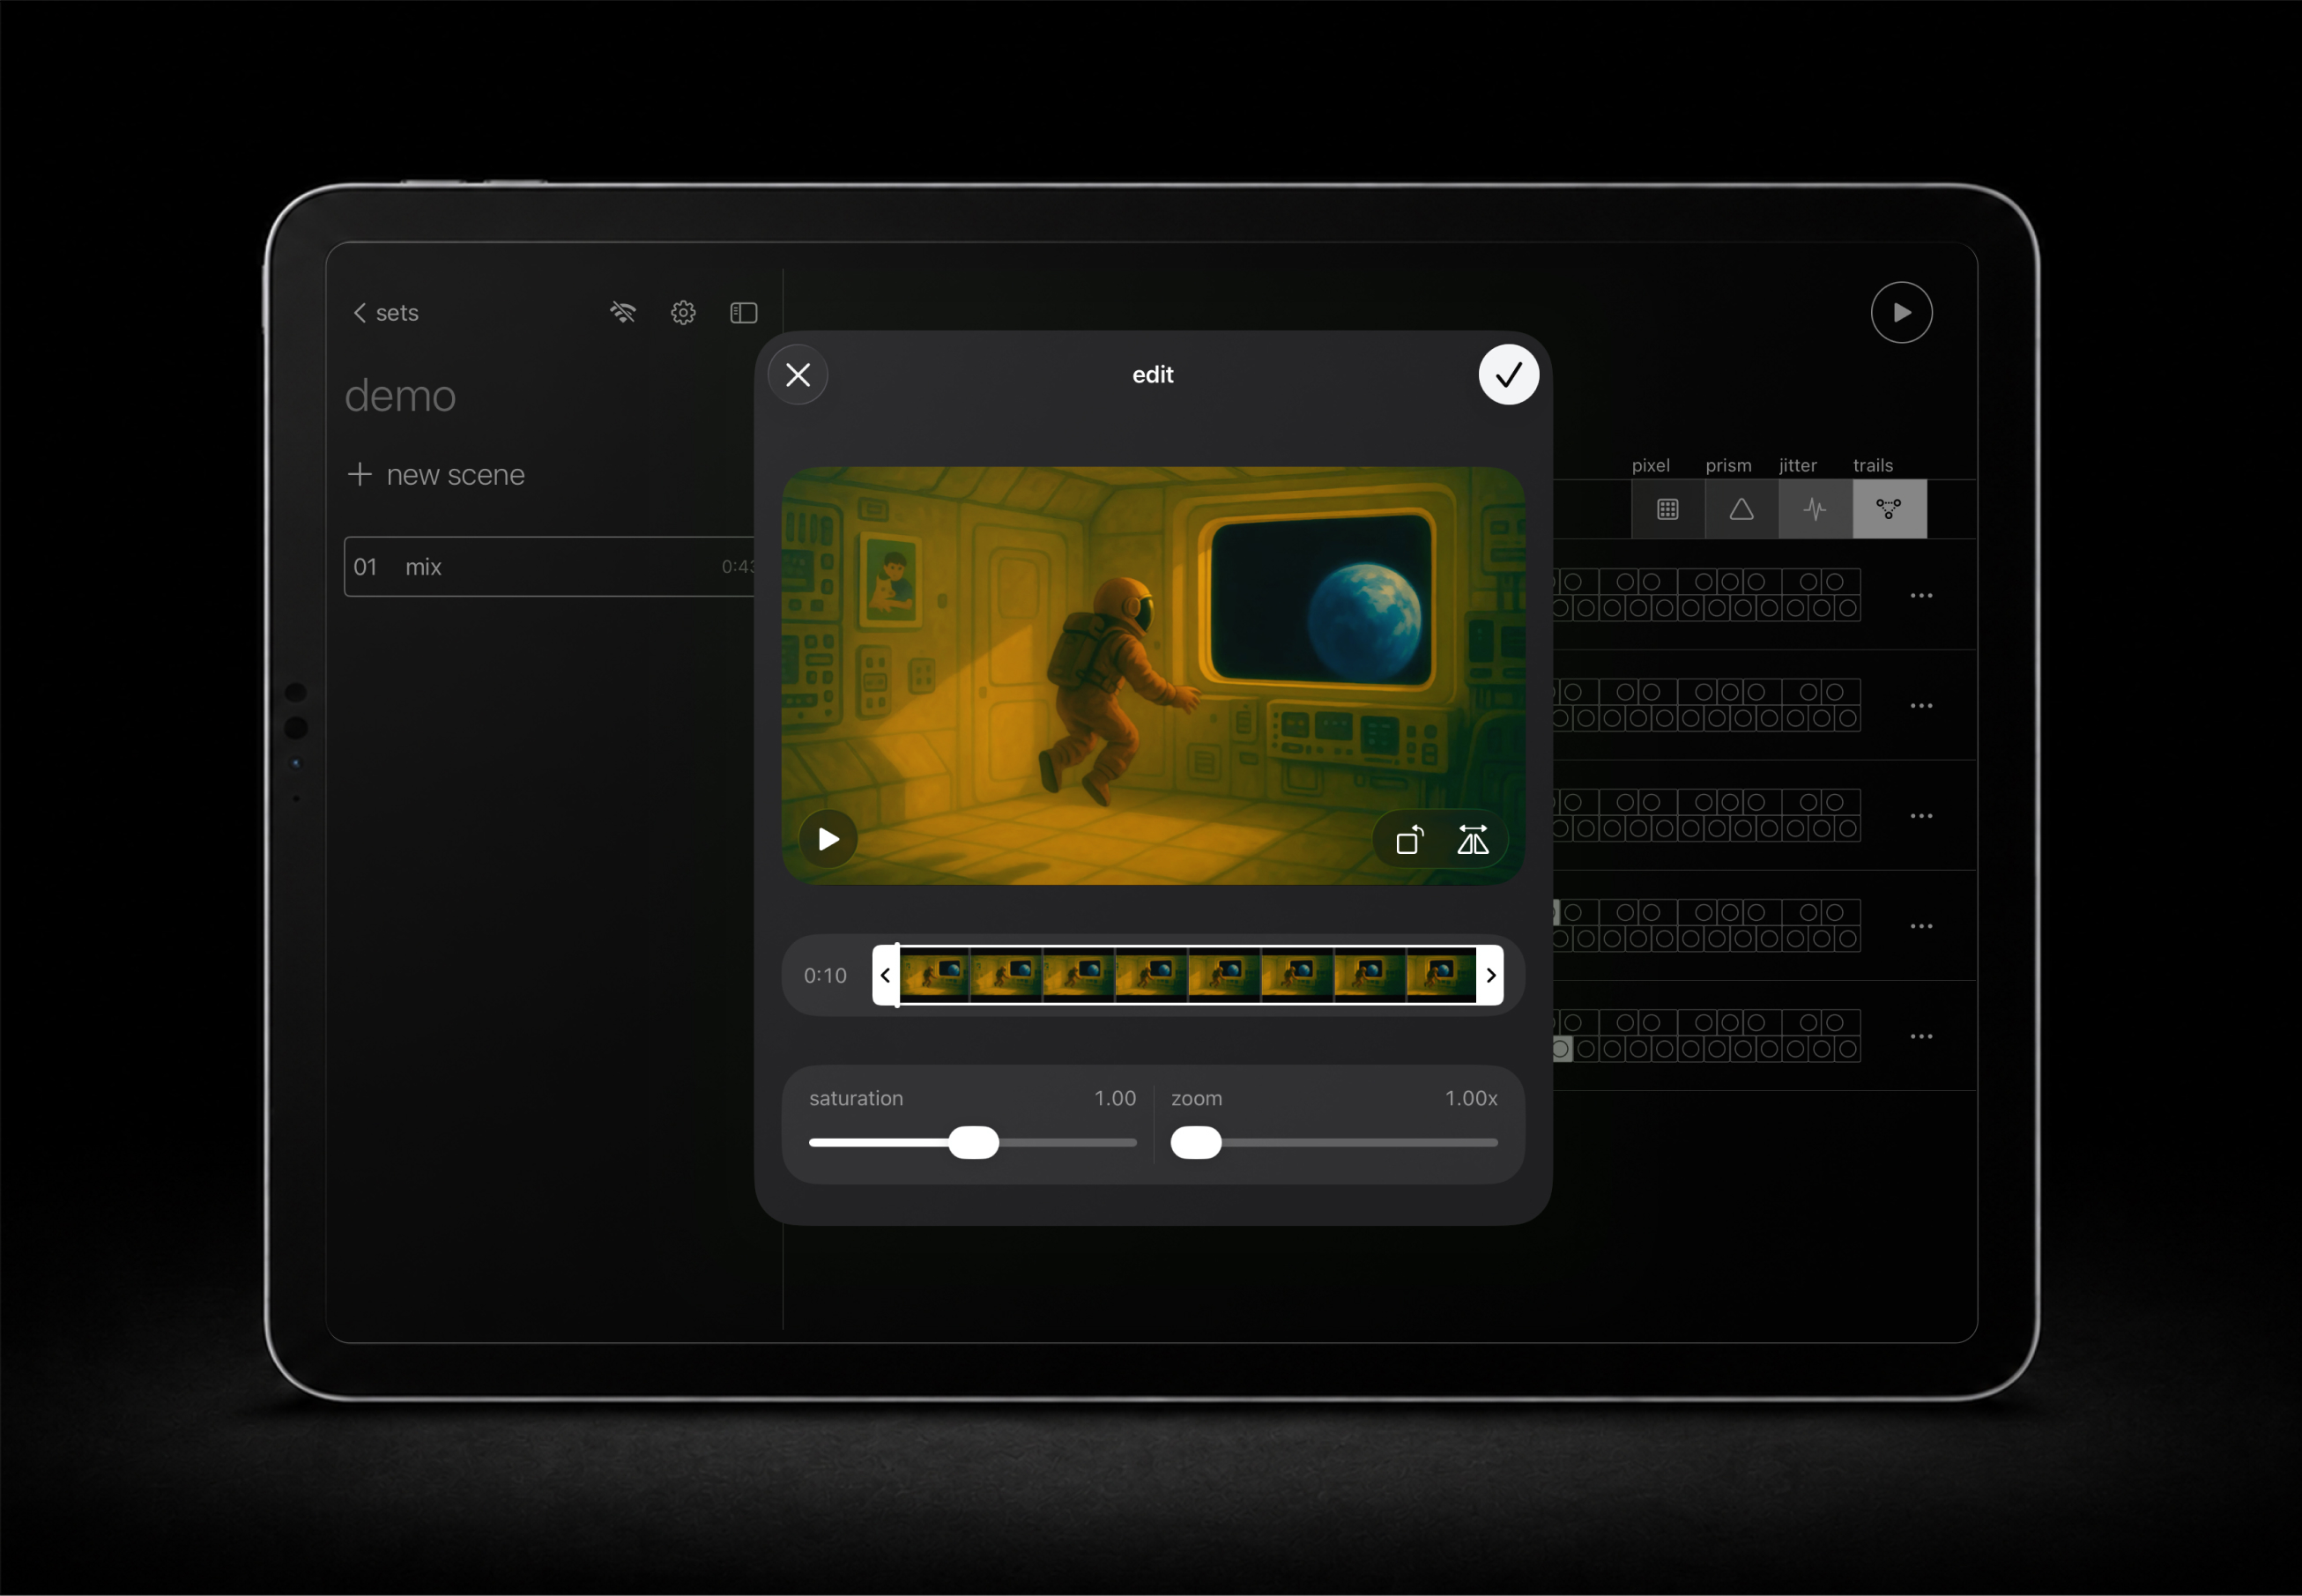
9. control vfx
vfx are live video effects assigned per scene. they affect the current video output during performance, including while mixes are happening.
each scene has four vfx slots. OP‑XY controls those slots with CC1, CC2, CC3, and CC4. the default assignments are pixel, prism, jitter, and trails, but each scene can use different effects.
to set up vfx:
- select a scene.
- tap a vfx cell in the scene control strip.
- choose the effect for that slot.
- repeat for the remaining slots.
- open
Settings > VFXif you want to tune global presets or MIDI sensitivity. - in perform mode, move OP‑XY
CC1throughCC4, or drag the vfx cells on the device while rehearsing and testing.
vfx assignments are scene-specific. preset tuning is global per effect, so changing the saved look of an effect changes that effect wherever it is assigned.
because vfx ride on standard CC, they can be sequenced. record CC1 through CC4 automation into the external MIDI track on OP‑XY and the vfx will move in time with the song, hands-free. for continuous motion, assign an OP‑XY LFO to a vfx CC.
available vfx
- bloom — pushes bright areas into a wider glowing halo.
- blur — softens the picture into a glowing defocused wash.
- echo — feeds the previous frame back as a scaled, rotating echo.
- fade — fades toward grainy black-and-white contrast.
- jitter — shakes the frame and adds fast brightness flicker.
- mirror — mirrors the image into denser radial symmetry lines.
- pixel — blocks the image into chunky squares and reduces color detail.
- prism — splits color channels into shifting spectral facets.
- pulse — rhythmically boosts exposure and contrast.
- roll — rolls the frame vertically with scanline interference.
- shift — rotates hue and saturation for live color cycling.
- smear — drags the image sideways with motion-blurred mosh trails.
- stutter — holds and blends repeated frames for a frozen-step feel.
- thermal — maps luminance into a heat-camera false-color look.
- trails — blends recent frames back in as soft motion echoes.
- vhs — adds drifting color offset, scanlines, and grain.
- zoom — zooms in above center, or zooms out into tiled copies below center.

10. choose mixes
mix controls how VJ‑XY moves from one clip to another. each scene has a default mix, and individual clips can optionally override it.
use simple mixes for reliability. a hard cut is immediate. crossfade, dissolve, and wipe give more motion between clips, and the scene mix also applies when a looping clip wraps back to its start.
to choose a scene mix:
- select a scene.
- tap
mix. - choose the transition style.
- open
Settings > Mixto tune the global parameters for each mix type. - rehearse clip changes with the actual media you plan to use.
use clip overrides sparingly. they are useful for a clip that needs a special transition, but the scene default should handle most changes.

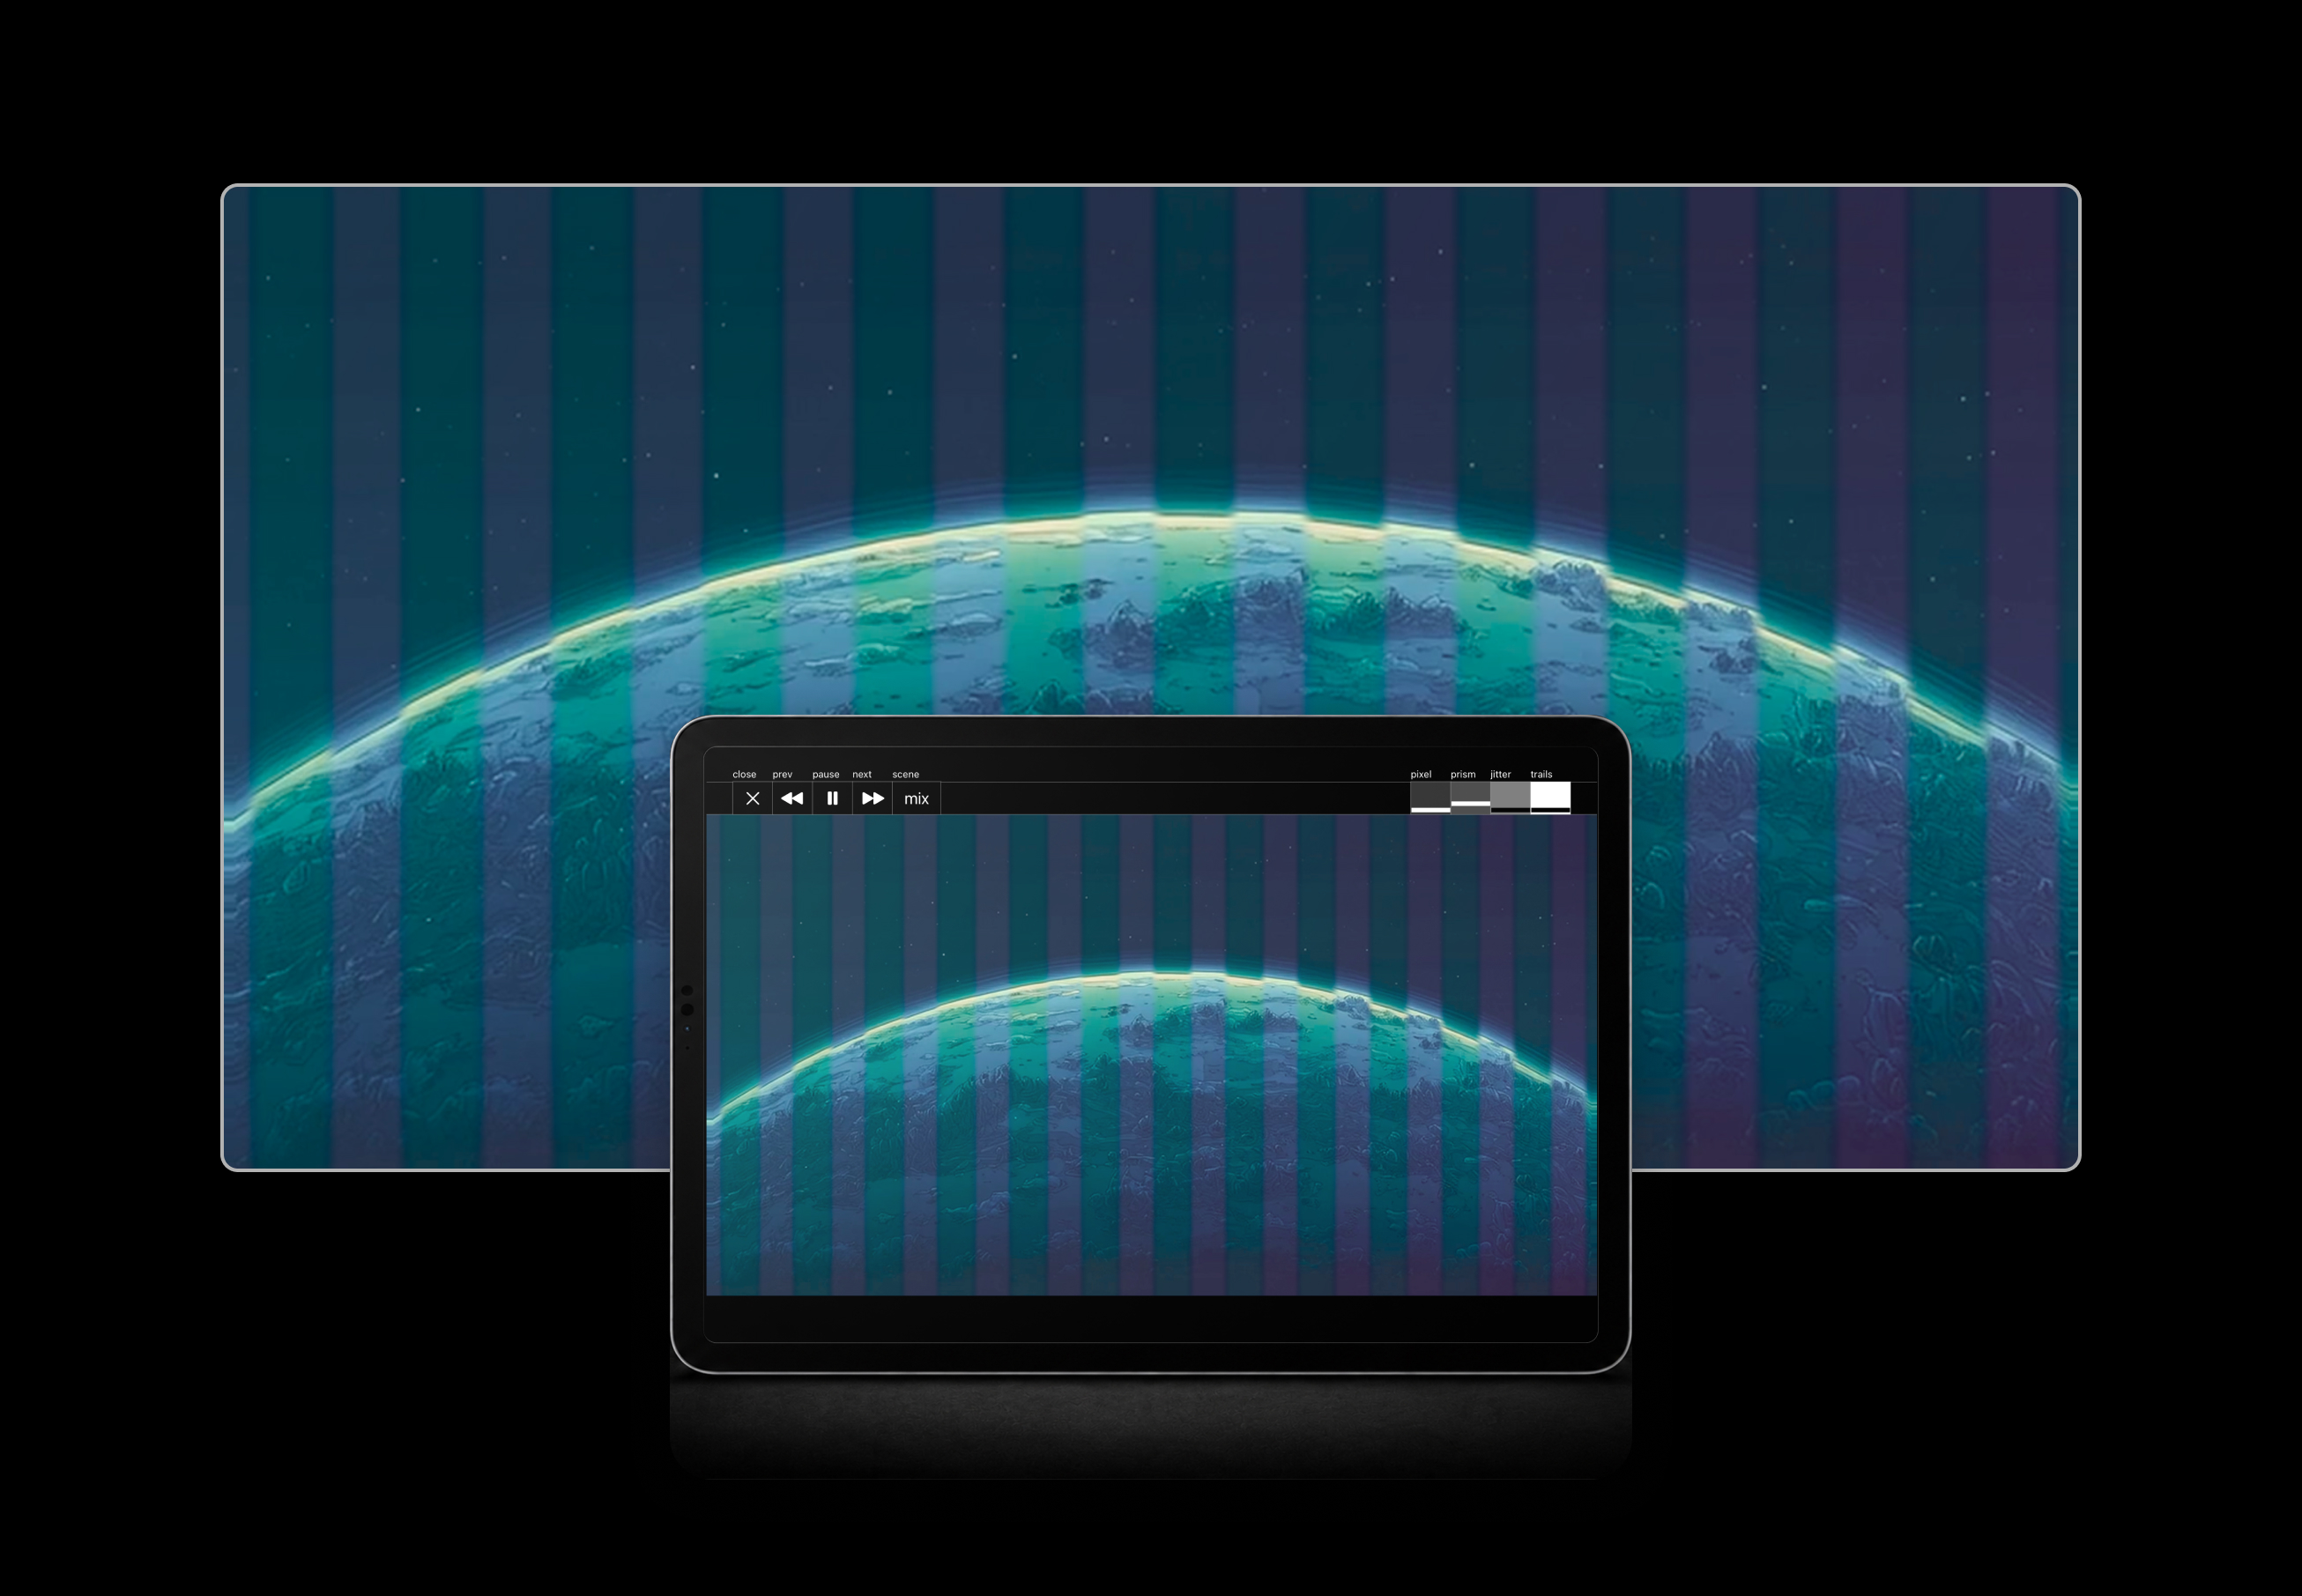
11. perform
perform mode is the live output surface. it prioritises the audience image and quick correction over editing, while OP‑XY remains the primary controller.
press the prominent play button to enter perform mode. if no external display is connected, the device shows the output locally for rehearsal. if an external display is connected, the audience output goes there while OP‑XY remains the main live controller.
in perform mode:
- tap the screen to show controls.
- use previous and next for quick clip correction.
- use play/pause to freeze or resume output without leaving perform mode.
- move vfx from OP‑XY with
CC1throughCC4. - exit perform mode when setup or editing is needed.
VJ‑XY keeps the screen awake during perform mode, including paused playback and external display use. normal idle behavior returns when perform mode exits or the app backgrounds.
12. use an external display
the external display is clean audience output. it should show only visuals, not app controls.
connect the display path before the show and test it with the actual adapter, projector, capture device, or venue screen. some HDMI adapters and capture chains add visible delay, so the display path should be treated as part of the instrument setup.
to check display output:
- connect the display or projector.
- open VJ‑XY and select a scene.
- press play.
- confirm the external display is full-screen visual output.
- confirm the device running VJ‑XY still shows the local app surface.
- trigger several clips and vfx changes from OP‑XY.
the known-good baseline is Apple's USB‑C Digital AV Multiport Adapter. avoid extra converters where possible.

13. prepare media
VJ‑XY works best with prepared visual material. the app is designed for performance playback and non-destructive presentation edits, not for heavy video editing.
use 1920 x 1080 16:9 media when possible. short loops are easier to rehearse, easier to navigate, and more predictable when triggered from OP‑XY.
recommended media prep:
- edit loops in Photos or iMovie to get started, or use pro editors such as DaVinci Resolve and Final Cut Pro for more detailed work.
- export short MP4 or MOV clips when possible.
- keep important action inside a 16:9 frame.
- remove or ignore audio because VJ‑XY keeps playback muted.
- import from Files or the photo library.
- check each clip in VJ‑XY before the set.
portrait videos and still images can be used. VJ‑XY fits them into the 16:9 audience canvas, and clip editing can rotate, mirror, adjust saturation, and scale without rewriting the source file.
animated GIFs work as scene clips and as canvas layers. keep GIF loops short so triggers stay tight, prefer transparent GIFs when they will sit over other layers, and test the animation timing inside VJ‑XY before relying on it live.
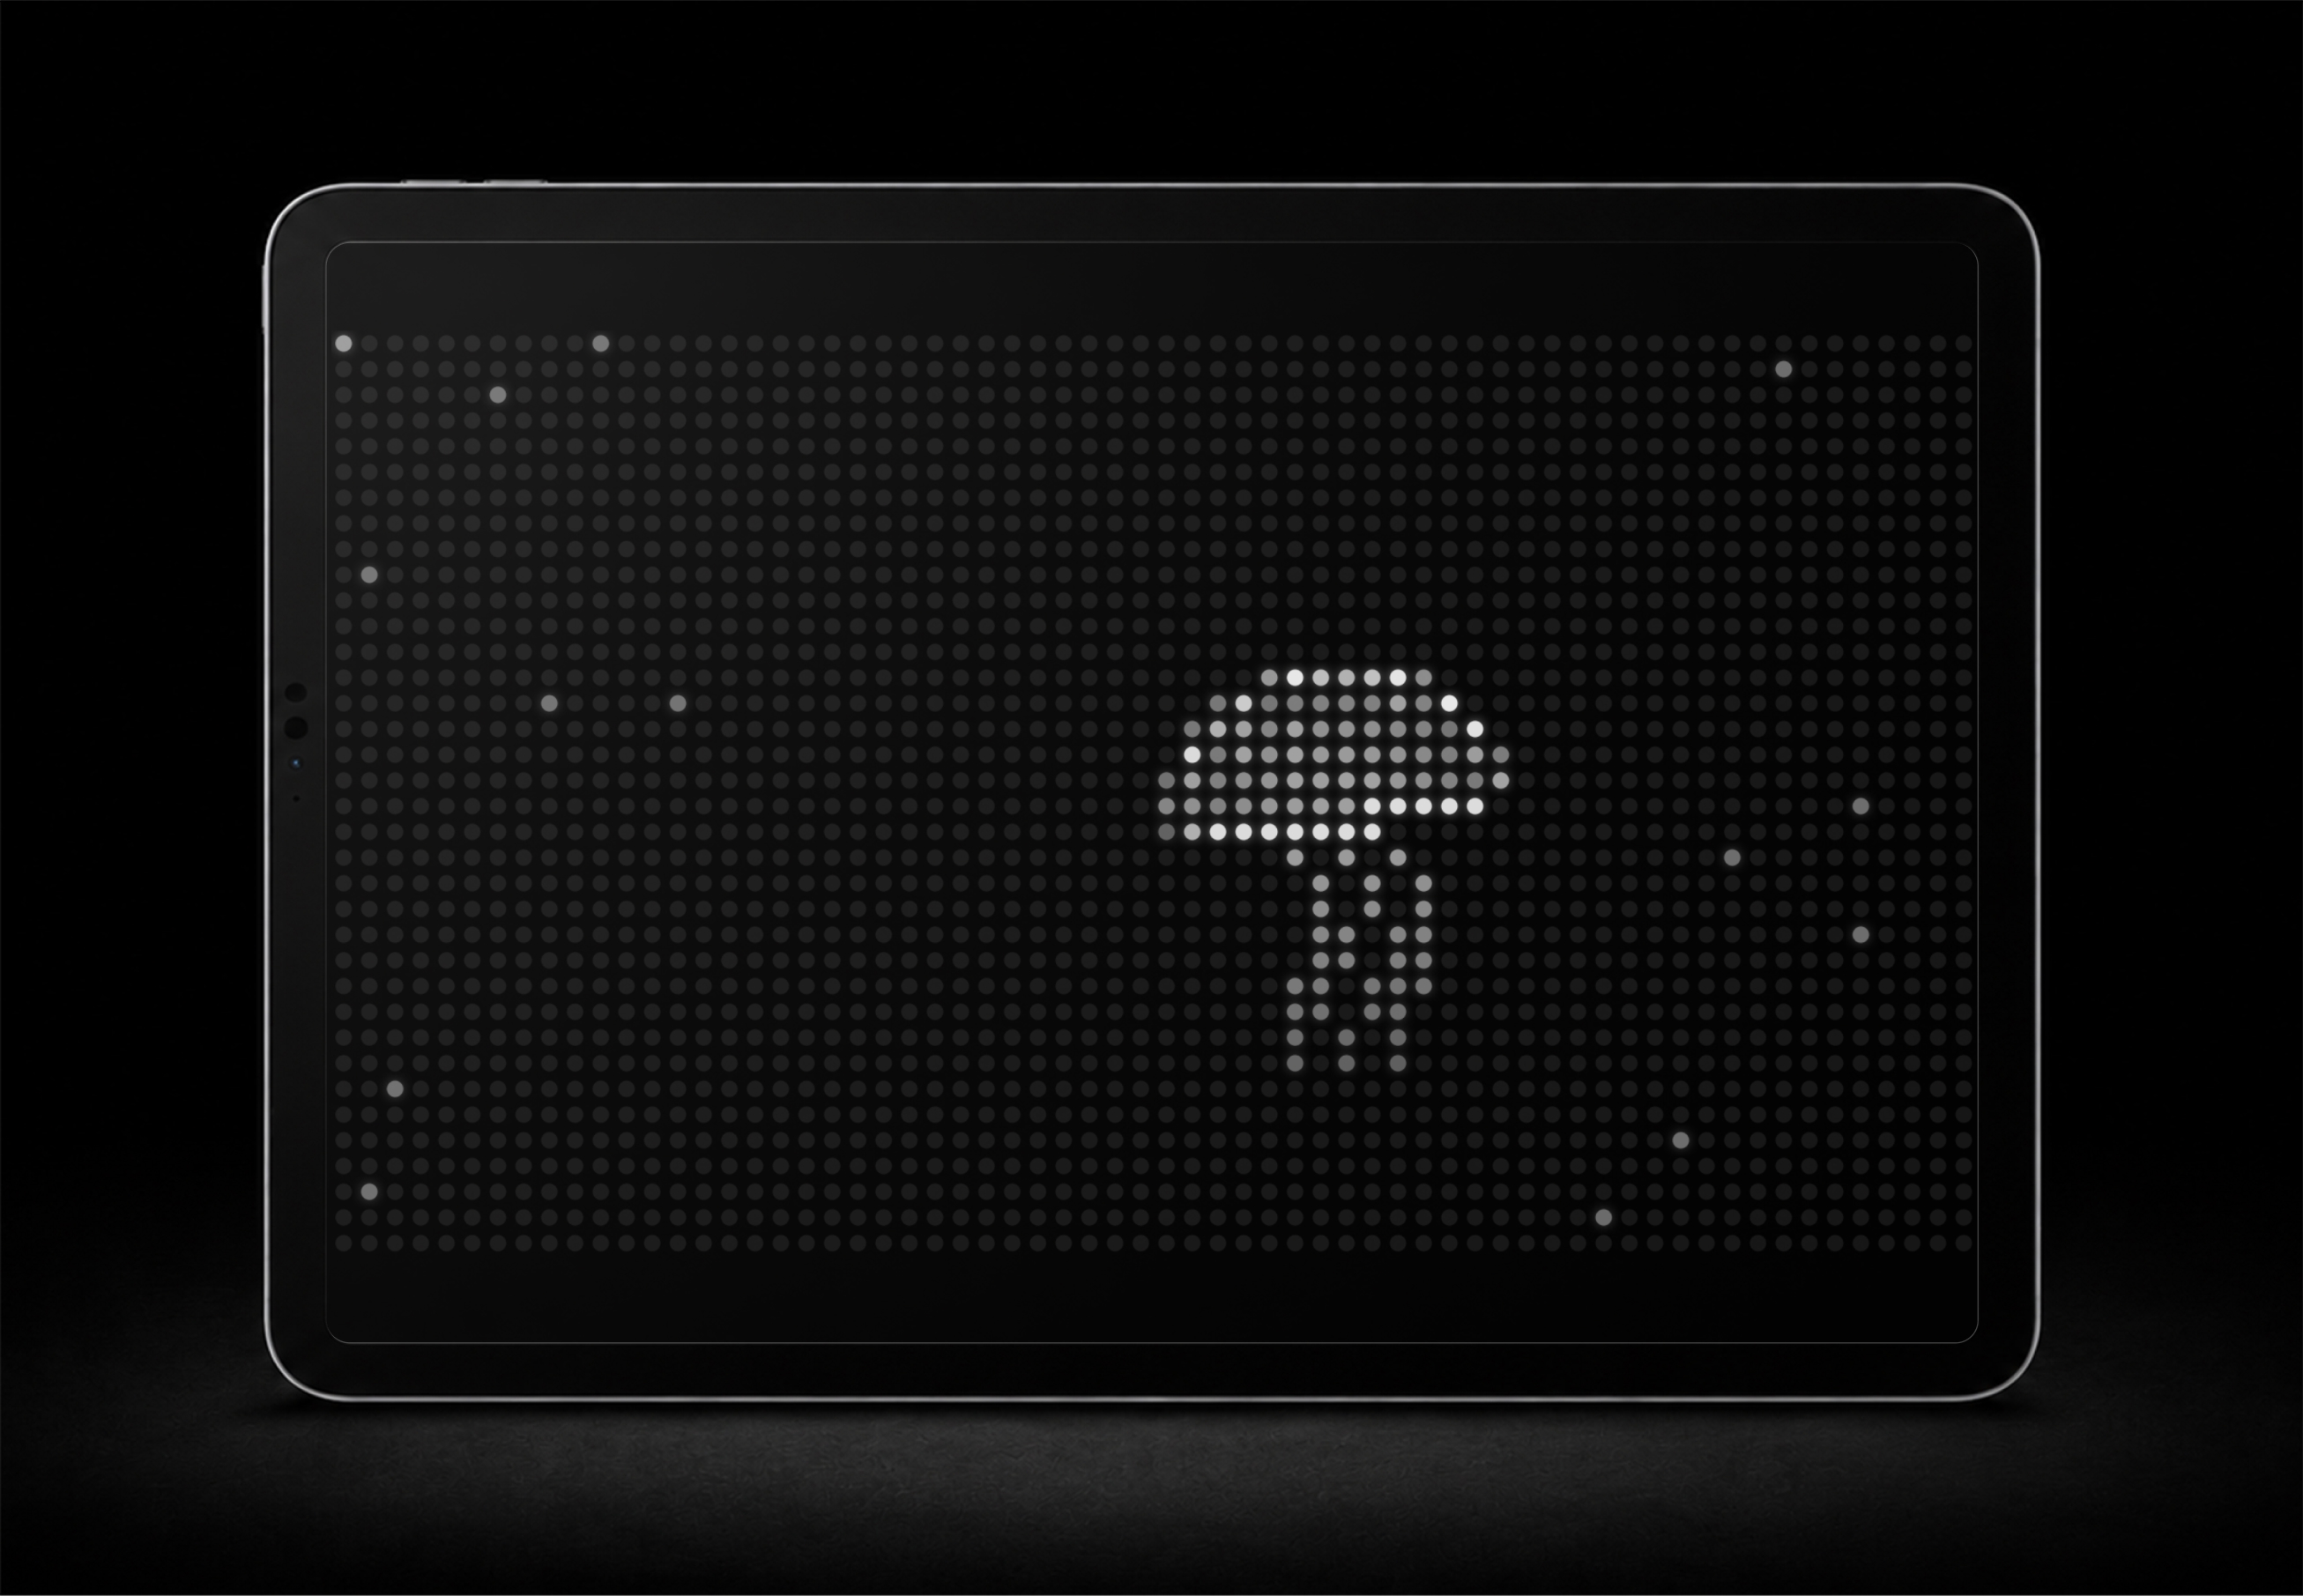
14. matrix clips
matrix clips are generated visuals built into VJ‑XY. they behave like normal scene clips but do not use imported media files.
use matrix when you want rhythmic LED-style patterns, subtitles, signal graphics, or a quick visual idea without preparing a video file. the subtitles matrix clip is useful for adding text to a scene.
to add matrix:
- select a scene.
- tap
clips. - choose
matrix. - pick a preset.
- set the background color and dot color to suit the scene.
- reorder it like any other scene clip.
- press play or trigger it from OP‑XY.
when a matrix clip is active in perform mode, the four live control slots change behavior. CC1 controls speed, CC2 controls the preset-specific parameter, and CC3 plus CC4 are disabled for that clip.
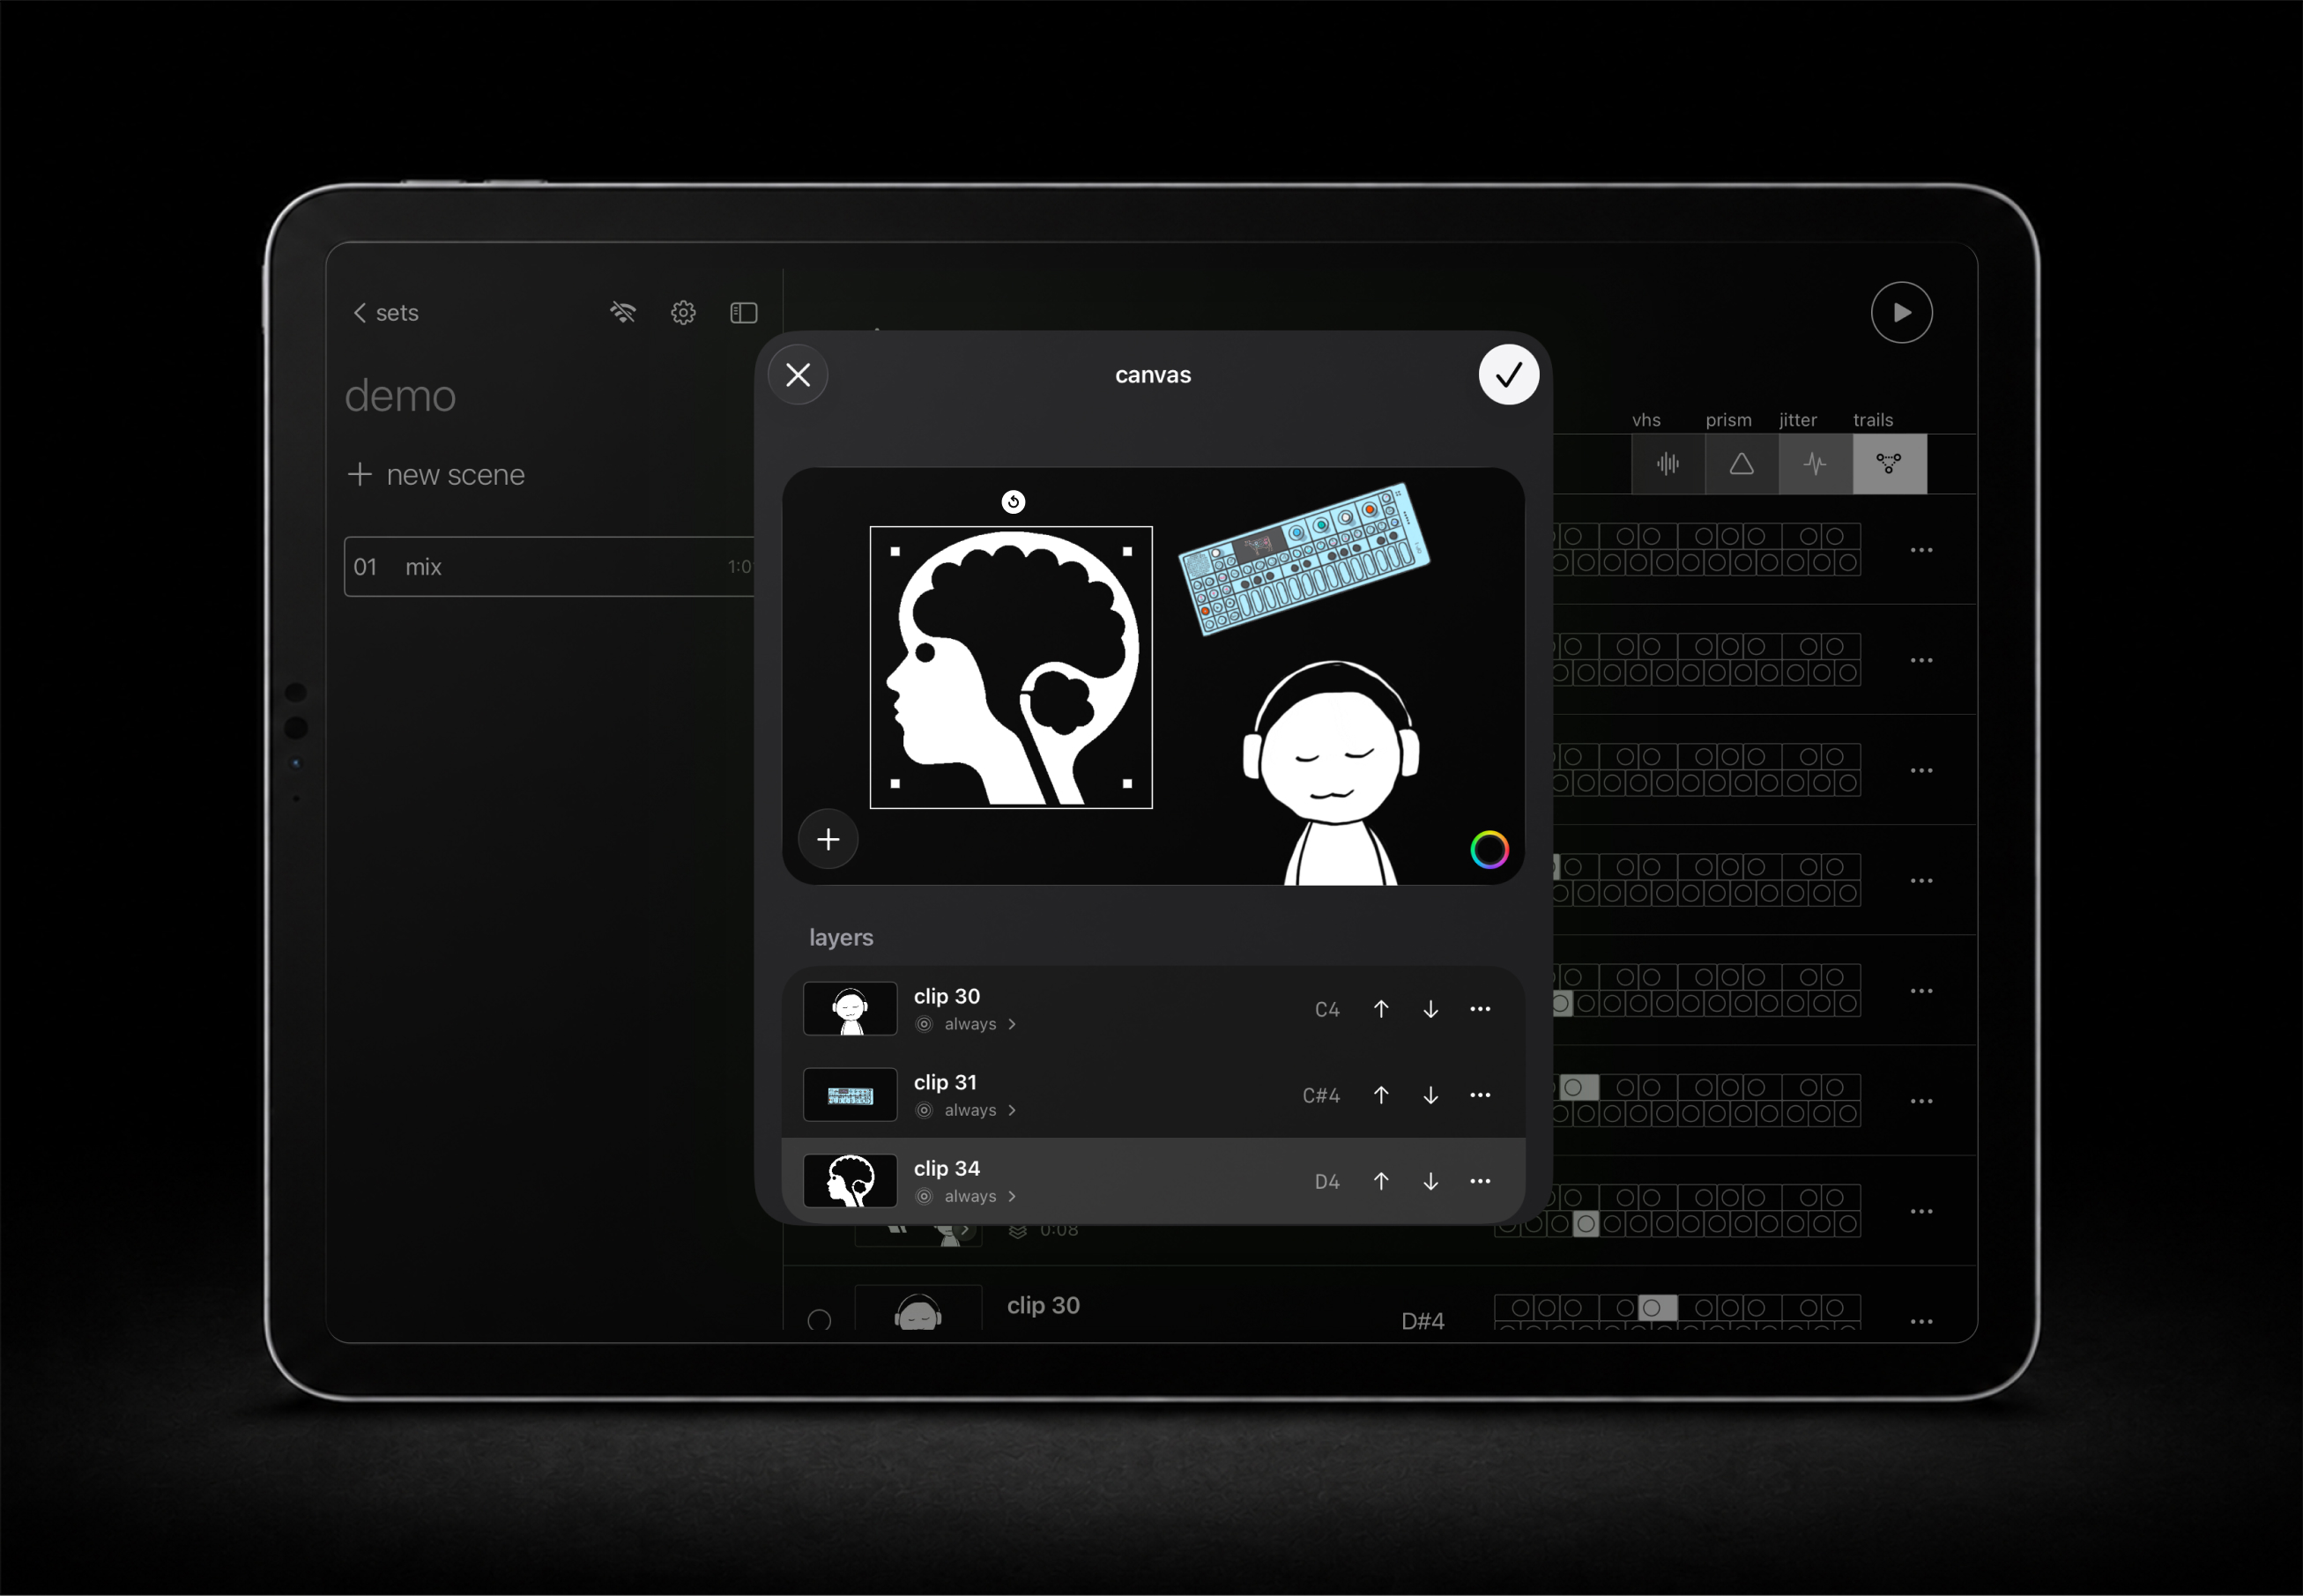
15. canvas clips
canvas clips let you build one 16:9 visual from multiple still images and animated GIF layers. a canvas clip behaves like a normal scene clip: it has a row in the scene, gets its own OP‑XY note, and works with previous/next, cycle, shuffle, and clip transitions.
use canvas clips when you want several transparent GIFs or images on screen at the same time, such as characters, logos, loops, stickers, visual accents, or layered backgrounds.
to add a canvas clip:
- select a scene.
- tap
clips. - choose
canvas. - use the canvas editor to add layers from
user,files, orlibrary. - drag layers to position them, and use the corner handles to scale, rotate, and arrange them.
- choose each layer's trigger:
always,tap,toggle,hold, oronce. - rehearse the assigned notes from OP‑XY.
blend modes let canvas layers multiply, screen, invert, or otherwise react to the layers behind them.
the parent canvas row gets the first note. nested layers get the following notes in order. triggering a nested layer also summons the parent canvas clip, then applies that layer's trigger behavior.
16. clip editing
clip editing is for quick performance prep. it changes how a clip appears in VJ‑XY without rewriting imported media.
file-backed clips can be renamed and adjusted. video and GIF clips also support non-destructive loop-section selection, so you can use only part of a longer file without exporting a new version.
common edits:
- rename a clip for performance clarity.
- rotate counterclockwise if the source orientation needs correction.
- mirror horizontally.
- adjust saturation.
- scale and crop toward the center.
- set a loop section for video or GIF.
- apply a blend mode to combine the clip with the background.
- choose a background color so blend modes have something to react to.
- apply edits to all instances if the change should become the shared default.
scene clip edits affect that scene row by default. this lets the same imported media appear differently in different scenes or positions.
blend modes and background colors work together. pair a transparent clip or a high-contrast loop with a chosen background and the clip comes alive against it.
17. troubleshooting
start troubleshooting from the signal path: MIDI input, scene channel, note range, vfx CC, then display output.
no MIDI blink
reconnect OP‑XY from the sidebar MIDI/Wi‑Fi button, or check the USB‑C MIDI path. send any note or CC and watch the receive indicator. if there is no blink, VJ‑XY is not receiving MIDI yet.
wrong scene triggers
check the scene ch value and look for duplicate scene channels in the same set. OP‑XY and the active scene need to agree on the MIDI channel.
wrong clip triggers
check the clip order in the scene. notes start at F3, then move upward through the scene list.
wrong canvas layer triggers
canvas layers flatten into the note order after the parent canvas row. check the layer order inside the canvas editor and confirm the note offset against the scene's clip list. reordering layers or canvases shifts the notes that follow.
GIF not animating
confirm the file is an animated GIF rather than a single-frame export, and re-import if it came in from a screenshot or share sheet that flattened it. very long GIFs can also feel static at first glance — preview the clip in VJ‑XY and let it play through one loop.
vfx not moving
check that OP‑XY M2 encoders are set to CC1, CC2, CC3, and CC4. then check the scene's vfx assignments and Settings > VFX sensitivity.
display lag
try a more direct display path. extra HDMI converters, capture devices, splitters, and some adapters can add delay.
no projector output
reconnect the display, then enter perform mode again. confirm the device running VJ‑XY sees the external display and that the projector is on the correct input.
18. feedback
VJ‑XY is being shaped around real performance use. if a guide step is unclear, a setup path fails in rehearsal, or a live control feels wrong, send feedback to support@thinkthx.com.
OP‑XY is a trademark of teenage engineering. VJ‑XY is not affiliated with or endorsed by teenage engineering.